
Ubuntu/Linuxにフォントをインストールする方法について調べたのでメモしておきます。
環境
Panasonic Let’snote LX
Ubuntu 16.04 LTS
確認
さきにUbuntuにインストールされているフォントを確認します。
# インストールされているフォントを表示
$ fc-list | head
/usr/share/fonts/truetype/lato/Lato-Medium.ttf: Lato,Lato Medium:style=Medium,Regular
/usr/share/fonts/truetype/msttcorefonts/comicbd.ttf: Comic Sans MS:style=Bold,Negreta,tučné,fed,Fett,Έντονα,Negrita,Lihavoitu,Gras,Félkövér,Grassetto,Vet,Halvfet,Pogrubiony,Negrito,Полужирный,Fet,Kalın,Krepko,Lodia
/usr/share/fonts/truetype/tlwg/TlwgTypo-Bold.ttf: Tlwg Typo:style=Bold
/usr/share/fonts/truetype/lato/Lato-SemiboldItalic.ttf: Lato,Lato Semibold:style=Semibold Italic,Italic
/usr/share/texmf/fonts/opentype/public/lm/lmmonolt10-oblique.otf: Latin Modern Mono Light,LM Mono Light 10:style=10 Oblique,Italic
/usr/share/fonts/truetype/dejavu/DejaVuSerif-Bold.ttf: DejaVu Serif:style=Bold
/usr/share/fonts/truetype/tlwg/TlwgTypewriter-BoldOblique.ttf: Tlwg Typewriter:style=Bold Oblique
/usr/share/texmf/fonts/opentype/public/lm/lmmono10-italic.otf: Latin Modern Mono,LM Mono 10:style=10 Italic,Italic
/usr/share/fonts/truetype/dejavu/DejaVuSansMono.ttf: DejaVu Sans Mono:style=Book
/usr/share/fonts/X11/Type1/s050000l.pfb: Standard Symbols L:style=Regular
インストール
標準でインストールされているFont Viewrを使う方法と特定のディレクトリにコピーする方法の大きく2種類があります。
方法1: Font Viewer
フォントファイル(.ttf, .otf)をダブルクリックで開くとFont Viewrが起動します。
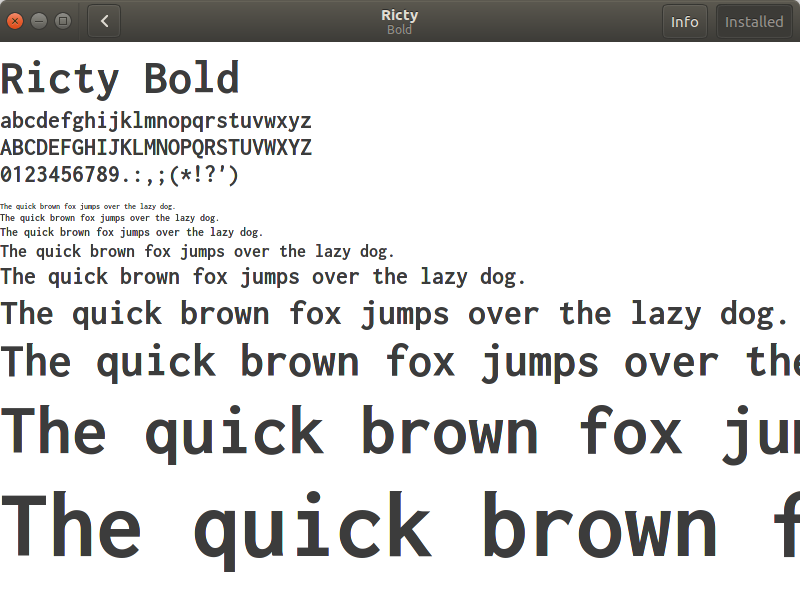
Font Viewerの右上端にあるインストールボタンをクリックするとインストールされます。
# Font Viewerでインストールしたフォントの確認
$ fc-list | grep Ricty
/home/hiyoshi/.local/share/fonts/RictyDiscord-Bold.ttf: Ricty Discord:style=Bold
/home/hiyoshi/.local/share/fonts/Ricty-Bold.ttf: Ricty:style=Bold
/home/hiyoshi/.local/share/fonts/Ricty-Regular.ttf: Ricty:style=Regular
/home/hiyoshi/.local/share/fonts/RictyDiscord-Regular.ttf: Ricty Discord:style=Regular
fc-listコマンドの出力結果を見ると、Font Viewerでインストールしたフォントは、~/.local/share/fonts/下にコピーされるようです。
方法2: ディレクトリにコピー
手動でフォントをインストールする方法です。
# フォントディレクトリリストを確認
$ less /etc/fonts/fonts.conf
<!-- Font directory list -->

	<dir>/usr/share/fonts</dir>
	<dir>/usr/local/share/fonts</dir>
	<dir prefix="xdg">fonts</dir>
	<!-- the following element will be removed in the future -->
	<dir>~/.fonts</dir>

# FONT_FILEをフォントディレクトリにコピー
$ cp FONT_FILE ~/.local/share/fonts

# インストールの確認
$ fc-list | grep FONT_FILE_NAME
~/.local/share/fontsディレクトリにフォントをコピーした後、fc-listコマンドでフォントがインストールされているか確認しています。
ユーザのホームディレクトリ下ではなく/usrディレクトリ下にコピーすると、システム全体にフォントが利用できます。
~/.fonts/はコメントの通りフォントディレクトリリストから外れる可能性があるようなので、Font Viewerのインストール先に設定されている~/.local/share/fonts/にコピーしています。

【Linux】Ubuntuでフォントをインストールする方法